Between getting ready for Hurricane Irma, which is headed our way in a couple of days and is threatening to become a category 5 storm…

…and doing some “round tuit” household chores (“I’ll do it when I get a round tuit”) on Labor Day Monday…

…it was time to gather up the flashlights at home.
Anitra ran to get me one, and came back annoyed.

“I bought this ages ago,” she said, “and it was still in the packaging. The battery compartment’s all screwed up!”
“Screwed up how?” I asked.
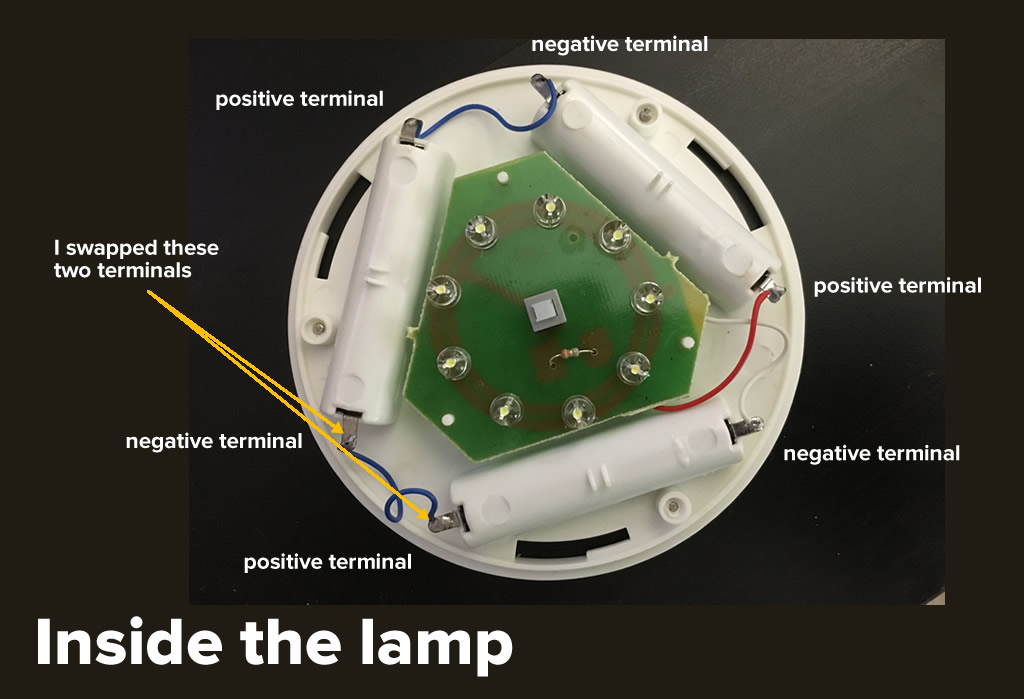
She opened up the back of the flashlight to show me what she meant. This is what I saw:

In the photo above, the leftmost battery receptacle is set up properly. It has a negative terminal (the one with a spring) and a positive terminal.
The other two terminals are a carnival of half-assery:
- One of them has two positive terminals, and
- the other has two negative terminals.
“Wow,” I said. “That is screwed up. I should submit this to the You Had One Job Twitter account.”

From an electric circuit point of view, this isn’t really a problem. As long as the terminals can make contact with the battery, current will flow, and the bulbs will light up.
The problem is more about fit:
- The battery fit in the receptacle with the two positive terminals is too loose, and the battery won’t make contact with the terminals.
- The battery won’t fit into the receptacle with the two negative terminals — two springs takes up too much space.
“I can’t even return it!” Anitra said. “I don’t have the invoice anymore.”
“Maybe we won’t have to,” I said, and I took the flashlight to my desk in the home office. I wasn’t going to be beaten by a simple manufacturing defect.

I removed the three screws holding the flashlight together and saw that the fix was easy. It would be a simple matter of swapping two terminals, which would result in each receptacle having one positive and one negative terminal. The terminals slide out of the receptacle easily once you bend the metal tab holding them in place:
However, in the process of swapping the terminals, you need to disconnect at least one of them from the wire. Once you swap them, you have to reestablish the connection. It was time to break out the Christmas present that my in-laws gave me:
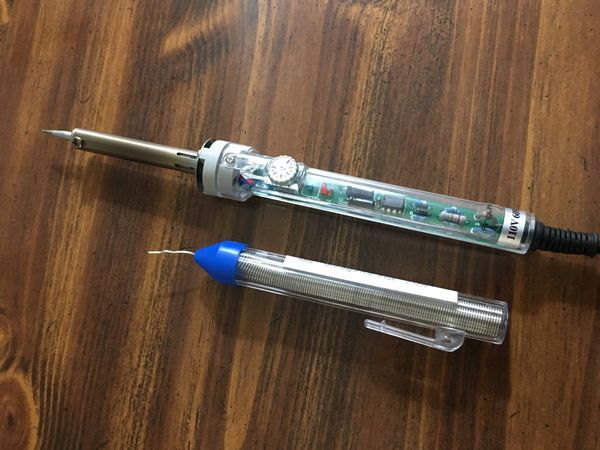
Late last year, they’d asked me what I wanted for Christmas. I suggested that I could use a soldering iron, and they delivered. Then things got crazy, what with suddenly having to search for a job and all the madness that ensued, so this ended up being my first chance to break it out.
I plugged in the iron, let it heat up, and moments later, I unsoldered one of the terminals. I then swapped the terminals, and then reconnected the loose terminal with a proper joint:

With the repair complete, I screwed the unit back together, and the battery receptacles now looked like this:
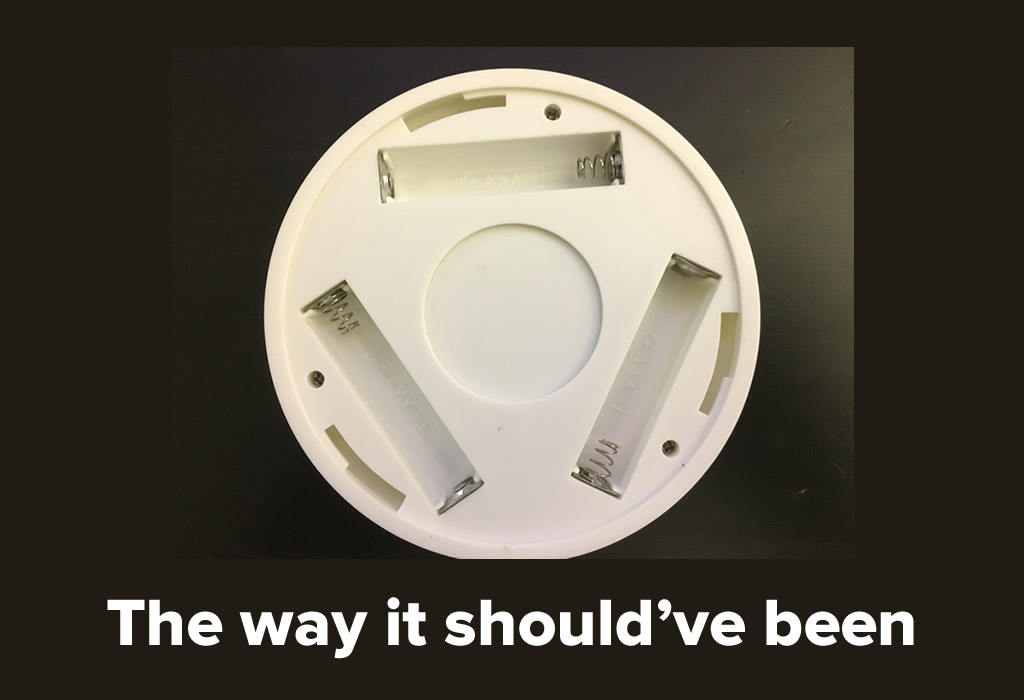
I inserted three fresh AAA batteries into the flashlight, closed the battery compartment, flipped it over, and pressed the power button. Here’s what happened:

Success!
I brought the flashlight to Anitra, who was impressed with my work. Red Green was right:

I am mindful of the fact that I’m fixing only one flashlight at my leisure, in the comfort of the ergonomic chair in my air-conditioned home office, and not hundreds or thousands every day on a barely-maintained assembly line in a non-air-conditioned factory in the Third World for a laughably tiny wage.
The repair I made would be considered laughably simple by an electrician or electronics tech, and I’m willing to bet it would’ve been within the abilities of most of the regulars at Tampa Hackerspace. They might even be amused that I found this incident worthy of writing a whole blog article, complete with photos.
But it is worthy of a blog article. I’m willing to bet that this repair would’ve been beyond most people, who — without a way to return or exchange the flashlight — would’ve simply tossed it in the trash or recycled it. That’s a pity, because in spite of the increasing complexity of our devices, a good number of them are still repairable with a modicum of skill, and as the do-it-yourselfers say, “If you can’t fix it, you don’t really own it.”

I’m not going to claim that I can do every kind of repair, but I’m glad that I’ve been able to do a number of them around the house, from this flashlight to the sensor in our washing machine to patching the chip in our granite kitchen counter to replacing the faucet in our kitchen sink.
It may actually be easier to perform a lot of household repairs yourself these days, thanks to the proliferation of YouTube repair videos. I wish I’d thought of recording one while repairing the flashlight. If you find yourself needing to fix something, search YouTube — the odds are goods that there’s a “how to fix it” video.
Another good source of “repair recipes” is iFixit, which is home to tens of thousands of electric and electronic repair guides, and they’re the people behind the Repair Manifesto featured above. I don’t know if they’ll ever come close to their stretch goal — a repair manual for every device in the world — but I applaud them for it.

And finally, if there’s a hackerspace or makerspace in your area — here in Tampa Bay, we’ve got places like Tampa Hackerspace, The Hive, and others — check it out, join it, support it, learn, and take control of the things you own.

There’s a price to be paid for fixing things yourself: time. What you save in money and from the landfill, you pay in the time invested in the repair, and if need be, learning how to do it.
But there’s a payoff — being able to fix things helps build a “can do” mindset. That’s something that you’ll bring with you wherever you go, and it’ll take you far in work, life, and play.
4 replies on “Would you be able to perform this simple household repair?”
Well done! As an electrical engineer, I could have not done it better. You opened it up and investigated the wiring. You fixed the mechanical problem and then rewired. Who ever assembled the connectors made the mistake, but I can not fault them because they were just assembling parts.
The next guy on the assembly line just made the connections based what he knew. He probably never saw that the wrong connectors where in the slots, he only saw tabs.
John: I think you’re right. A combination of a mix-up with inserting the connectors, coupled with the fact that you only see the tabs when doing the soldering probably led to the defect.
Hopefully it didn’t happen to too many people, but in a way, I’m grateful that it happened to me!
[…] Would you be able to perform this simple household repair? […]
[…] I’ve used it for all sorts of little repairs, including the time I fixed a manufacturing defect in one of our emergency lights. […]